
How to patch drywall
A nail hole takes 30 minutes and a thumbnail of spackle; a doorknob-sized hole takes three thin coats of mud and about half a day of waiting. The size of the hole picks the method, and water damage is not a patching job at all.
Skill level
Beginner
Time
Small holes 30 minutes plus drying; a medium patch is three thin coats across half a day
Materials
$25 – $110 depending on the hole, plus paint you may already have
Tools
10 on the list
Tools you will need
If you own none of these, buy the cheap version of each — they are all reusable.
- 3 in and 6 in putty knives
- Mud pan
- Sanding sponges, 120 and 220 grit
- Utility knife
- Drywall jab saw
- Drill and a dimpler bit
- Dust mask and eye protection
- Shop vac or damp rags
- PVA primer and a brush
- Texture spray can, if the wall is textured
Materials list, with the math
Quantities are worked out for the size of job described above, and the arithmetic is shown so you can adjust it for your own space.
Lightweight spackle
1 small tub · $6 – $9
For holes under 1/2 in and for dents. A small tub fills well over 200 nail holes, so one tub lasts years of picture hanging.
All-purpose joint compound
1 qt · $8 – $12
For any patch that gets tape. A quart covers about 25 sq ft in thin coats, and even a 6 in hole with three feathered coats uses well under 1 sq ft.
Mesh patches, 4 in x 4 in
2 · $5 – $8 each
The fast fix for holes from 1/2 in to 2 in. The mesh holds the first coat so it does not fall through the hole.
Drywall offcut or patch kit
1 · $8 – $14
For holes 2 to 6 in, a California patch uses drywall cut 2 in larger than the hole on every side: a 4 in hole needs an 8 in square, which leaves 2 in of paper on each side to mud over.
Paper or mesh joint tape
1 roll · $4 – $7
For a hole over 6 in that gets cut back to the studs. A roll tapes about 100 ft, far more than one repair needs.
Drywall screws, 1-1/4 in
1 box · $5 – $7
A screwed patch gets a screw every 6 to 8 in along each stud, so a 12 in high patch takes about four screws. A box holds enough for a lifetime of patches.
Sanding sponges
2 · $4 – $6 each
One coarse for the first sanding and one fine for the last pass. The final pass is what stops the patch showing under paint.
PVA drywall primer
1 qt · $12 – $18
Patch mud dries thirsty and matte, so paint over bare mud comes out flat and dull. A quart primes about 100 sq ft of patch.
Texture spray
1 can · $10 – $15
Only for a textured wall. One can covers about 25 sq ft of orange peel or knockdown, plenty for a patch with a generous blend around it.
Paint to match
as needed · reuse what is left over
Enough to paint the patch and feather out to the nearest corner, so the new paint does not read as a bright rectangle on the wall.
Estimated total
$25 – $110 depending on the hole, plus paint you may already have
The steps, in order
11 steps, in the order you would actually do them, with a time estimate for each.
- 1
Measure the damage and pick the method
Under 1/2 in is a filler job. From 1/2 in to 2 in takes a mesh patch. From 2 to 6 in wants a California patch: drywall with the face paper left on and the back peeled. Over 6 in gets cut back to the studs and screwed.
about 10 min
- 2
Clear the area and protect the floor
Move the furniture back, drop a cloth, and have the vacuum within reach. Cutting and sanding drywall makes fine dust, and it settles on everything in the room.
about 10 min
- 3
Cut the hole square
For anything over 2 in, cut the damaged area into a square or rectangle with a jab saw and make the edges straight. A ragged hole is far harder to hide than clean lines.
about 15 min
- 4
Fill the small holes
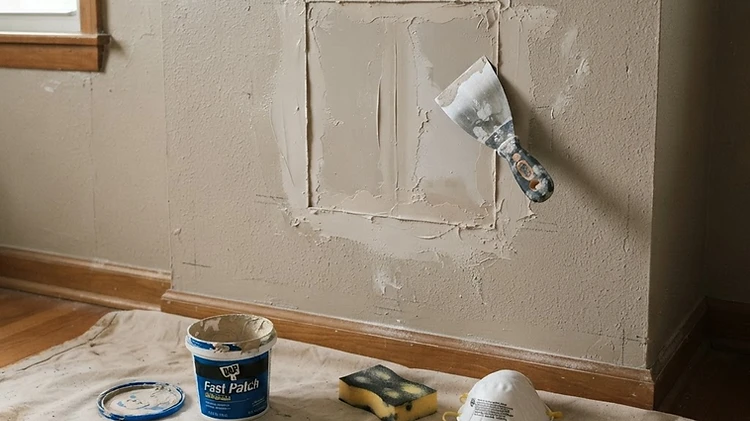
Nail holes and dents get spackle pressed in with a 3 in knife and scraped flush. Leave it very slightly proud and sand it back rather than filling it concave, because a hollow shows under a raking light.
about 15 min
- 5
Apply a mesh or California patch
Stick a mesh patch over a small hole and mud over it. For a California patch, cut the drywall piece 2 in larger than the hole on every side. Score the back, snap off the gypsum around the edges, and keep the front face paper attached as a flange. Press the gypsum center into the hole so the paper flange sits flat on the wall.
about 20 min
- 6
Screw a large patch to the studs
Cut a piece from the same thickness of drywall, 1/8 in smaller than the opening so it drops in, and screw it every 6 to 8 in along each stud. Dimple the heads just below the surface so they can be filled later.
about 30 min
- 7
Tape the seams
Bed the tape in a thin layer of mud, press it flat with the knife, and wipe the excess off hard. A thick first coat under tape is the reason taped seams end up looking lumpy.
about 30 min
- 8
Second coat, feathered wider
Once the first coat is dry, usually 4 to 12 hours, mud over the tape again and feather the edges out about 6 in. Feathered edges, not thick mud, are what make a patch invisible.
about 30 min
- 9
Third coat, feathered wider again
One more pass, working out to 10 or 12 in, then let it dry fully. Three thin coats beat one thick coat every time, because thick mud shrinks as it cures and cracks at the edges.
about 30 min
- 10
Sand lightly and prime
Sand with 220 grit and a light touch: you are knocking down ridges, not shaping the wall. Then prime the whole patched area, because unprimed mud paints up dull, flat and obvious.
about 30 min
- 11
Match the texture and paint
Spray texture around the patch, let it set, and compare it with the wall in raking light before painting. Paint the patch and feather the paint out to the nearest corner or break, so the sheen blends instead of forming a rectangle.
about 45 min
Safety notes
Before you start
- Wear a dust mask and eye protection when cutting or sanding drywall. The dust is fine and it goes everywhere.
- Homes built before 1978 may have lead paint, and joint compound made before 1980 can contain asbestos. Test an old repair before sanding it, or leave it to somebody qualified.
- Turn the breaker off if the repair is near an outlet, a switch or a light fitting, and keep the patch clear of any cable or box.
- Do not sand wet joint compound. Wait until it is dry, or you will move the mud instead of smoothing it.
- Support a ceiling patch before you cut it, because a sagging piece of drywall can come down while you work.
- Clean up with a damp cloth rather than a broom, which just lifts the dust back into the air.
Hire a licensed pro if
Hand these to someone licensed
- There is any water stain, soft or crumbly board, mold or a ceiling bulge. The leak has to be fixed first, or the moisture comes straight back through the new patch.
- The hole is larger than 6 in with no stud behind it, or the surrounding board is crumbling away.
- The wall is old plaster, or lath and plaster, which behaves nothing like drywall and needs a different repair.
- It is a fire-rated wall, such as a garage wall or a wall between units, where the patch has to be fire-taped properly.
- The patch is in a ceiling you cannot reach safely, or in a stairwell where scaffolding is the real job.
Frequently asked questions
- Can I patch a hole without cutting it out?
- Up to about 2 in, yes: a mesh patch and two or three thin coats of mud is a real repair. Larger holes need a plug or a screwed and taped patch, because mud on its own has nothing to hold on to.
- Why does my patch show after painting?
- Three usual reasons: it was not primed, the texture was not matched, or the paint went on as a rectangle instead of being feathered out to a break in the wall. Get all three right and the patch disappears.
- How long do I wait between coats of mud?
- Four to twelve hours for a thin coat, and longer in cold or damp air. Painting over damp mud guarantees the patch shows, so give it the time.
- Do I need tape on a small hole?
- Not on a nail hole. From about 1 in upwards, yes, because without tape the repair is only sitting in the hole rather than being tied to the board around it.
- Can I just paint over water damage?
- No. A stain bleeds through paint, and the board behind it is usually soft or moldy. Find and fix the leak, replace the damaged board, then patch and paint.
Related guides


Plan this in your own space
Two or three photos of your own room, yard or garage is enough. The app reads the space, then sizes the materials and the steps to what you actually have.
Plan this in your own space