
How to install floating shelves
A floating shelf holds weight by reaching the studs behind the drywall, not by gripping the drywall itself. Three 36 in shelves, each bolted into the studs with two lag bolts per stud. How much a floating shelf holds depends on the shelf and bracket you buy, so follow the manufacturer's weight rating and never exceed it. Bolting the bracket into studs is what lets it reach that rating.
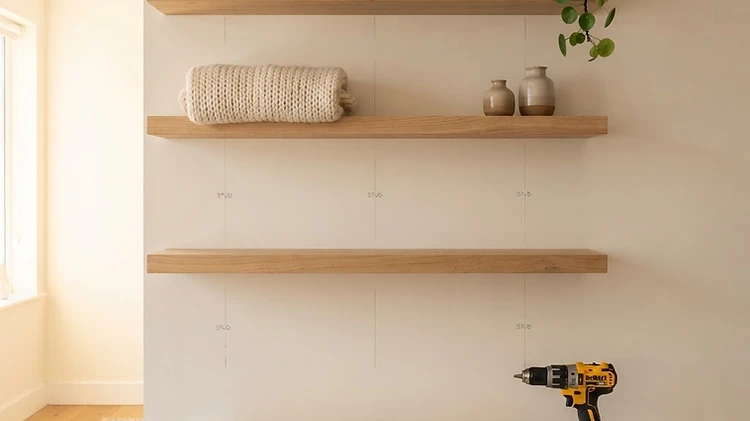
Skill level
Intermediate
Time
An afternoon: about 6 hours for three 36 in shelves
Materials
$175 – $275 for three shelves
Tools
10 on the list
Tools you will need
If you own none of these, buy the cheap version of each — they are all reusable.
- Stud finder, with AC detection if you have one
- 4 ft level
- Cordless drill and driver
- 5/32 in drill bit
- Countersink bit
- Tape measure and pencil
- Painter's tape
- Mallet
- Small level
- Caulk and touch-up paint
Materials list, with the math
Quantities are worked out for the size of job described above, and the arithmetic is shown so you can adjust it for your own space.
Floating shelves, 36 in, 2 in thick
3 · $32 – $48 each
A 36 in shelf will usually cross two or three studs at 16 in spacing depending on where it sits. Plan the shelf position so the bracket hits at least two. How much a floating shelf holds depends on the shelf and bracket you buy, so follow the manufacturer's weight rating and never exceed it. Bolting the bracket into studs is what lets it reach that rating.
Steel or hardwood cleats, 34 in
3 · $9 – $14 each
The cleat carries the load, so it runs the width of the shelf less an inch at each end. Steel is thinner and hides better; hardwood is easier to cut to a stud that is not where you expected it.
1/4 in x 3 in lag bolts with washers
24 · $0.60 – $1.10 each
Two bolts per stud, up to three studs a shelf, so 18 bolts at most for three shelves, plus six spare for a stud that sits off center or a fourth stud you decide to use.
2.5 in construction screws
1 box · $8 – $12
Four screws per shelf fasten the shelf body up into the cleat: 12 for the job, and a box holds fifty.
Toggle bolts, 3/16 in
6 · $1.50 – $2.50 each
For a position with no stud behind it, two toggle bolts per unsupported end. They spread the load behind the drywall, where a plastic anchor simply pulls through, so keep that end light.
Wood filler and touch-up paint
1 each · $12 – $18
For the countersunk screw heads and the caulk line along the wall. One small tub and a sample pot is more than enough.
Paintable caulk
1 tube · $6 – $9
A thin bead behind each shelf closes the shadow line that makes a shelf look like it is floating, and stops dust settling in the gap.
Leveling shims
1 pack · $5 – $8
Older walls are rarely flat. A shim behind the cleat at one stud takes out the wobble instead of forcing the shelf off the line.
Estimated total
$175 – $275 before tools you may already own
The steps, in order
10 steps, in the order you would actually do them, with a time estimate for each.
- 1
Decide the layout on the wall
Tape paper templates at the finished height. Twelve inches between shelves and eighteen above a desk or counter reads well. Stand back at eye level and check the spacing against the furniture below before you make a single hole.
about 30 min
- 2
Find the studs and mark their centers
Sweep across the wall with the stud finder and mark both edges of each stud, then the center. Studs sit 16 or 24 in apart, so if the marks come out closer than that, sweep again before trusting them.
about 20 min
- 3
Check for wiring and pipes before drilling
Use a finder with AC detection and keep every hole at least 2 in clear of outlets, switches and any vertical cable or pipe run. Never drill a hole on a guess about what is inside the wall.
about 15 min
- 4
Mark the cleat line and level it
Draw the line where the top of each cleat will sit, at both ends of the shelf. Carrying a 4 ft level across both marks is worth more than the small bubble on the shelf itself.
about 15 min
- 5
Cut the cleats to length
Cut each cleat 1 in shorter than the shelf so it hides inside the shelf body. A fine-tooth hacksaw for steel, a handsaw for hardwood, and a light sand on the cut ends either way.
about 20 min
- 6
Dry-fit the cleat and mark the bolt holes
Hold the cleat on the line, level it, and mark the center of every stud it crosses. Two holes per stud, about 2 in apart vertically, gives each bolt its own bite into the wood.
about 20 min
- 7
Drill the pilot holes
Pilot with a 5/32 in bit for a 1/4 in lag bolt into a wood stud, which is about two thirds of the bolt diameter. Drill deeper than the bolt is long, and keep the drill straight: an angled hole makes a bolt that will not seat flat.
about 20 min
- 8
Bolt the cleats to the studs
Drive the lag bolts with the driver on a low clutch setting, then finish them by hand so they are tight without stripping. Middle stud first, then check the level, then the outer studs.
about 40 min
- 9
Slide the shelf on and secure it
Push the shelf onto the cleat and check the reveal at both ends. Screw up from underneath into the cleat, four screws a shelf, and shim anything that rocks before you tighten it down.
about 30 min
- 10
Fill, caulk, then load-test it
Fill the screw heads, caulk the wall line, touch up the paint, then put about 40 lb in the middle of each shelf and leave it overnight. If the line is still true, it is set. If it sags, that shelf needed another stud or a shorter span.
about 40 min
Safety notes
Before you start
- Never drill a wall without checking for wiring and pipes first, and keep holes at least 2 in clear of outlets, switches and cable runs.
- Wear eye protection. Drilling drywall and hardwood throws grit, and a driver bit skipping off a screw head is worse.
- On a ladder, keep three points of contact and never stand on the top two steps.
- Drywall anchors alone will not hold a loaded shelf. A plastic anchor in half-inch drywall pulls out somewhere between 20 and 50 lb, and a shelf of books can weigh well over 100 lb.
- How much a floating shelf holds depends on the shelf and bracket you buy, so follow the manufacturer's weight rating and never exceed it. Bolting the bracket into studs is what lets it reach that rating. Spread the load along the shelf rather than piling it in the middle.
- Never hang a shelf over a crib, a bed or anywhere a heavy object could fall on somebody.
Hire a licensed pro if
Hand these to someone licensed
- There are no wood studs to bolt into: steel studs, brick, block, tile or plaster over masonry all need different fixings and different ratings.
- The shelf is longer than 6 ft, or it has to carry something heavy like a television, an amplifier or a row of tools.
- There is a soil stack, a drain run or a boiler flue behind the wall where the shelf needs to go.
- The shelves sit more than 8 ft up, or above a stairwell, where the ladder work is the real risk.
- It is a bathroom or kitchen wall where the fixing also has to stay watertight.
Frequently asked questions
- Can I hang a floating shelf without studs?
- Only for light things. A toggle bolt spreads the load behind the drywall and will hold decorative items of a few pounds, but a shelf carrying books, jars or tools needs studs, or a cleat long enough to reach the studs on either side.
- How much weight will a floating shelf hold?
- How much a floating shelf holds depends on the shelf and bracket you buy, so follow the manufacturer's weight rating and never exceed it. Bolting the bracket into studs is what lets it reach that rating. Spread the load along the shelf instead of loading the middle.
- Is a lag bolt overkill for a shelf?
- No. An ordinary screw into drywall has almost no pull-out strength, and a shelf is a lever that is always pulling outwards. Two 1/4 in lag bolts per stud is what makes a loaded shelf safe.
- My studs are 24 in apart. Does that change anything?
- It changes the span between fixings, not the method. At 24 in spacing a 36 in shelf may cross only two studs, so plan the position so the bracket hits both, and follow the manufacturer's rating for the shelf and bracket you buy.
- How deep and how far apart should shelves be?
- Eight to ten inches deep for books and display, and 12 in apart vertically for books, 14 to 16 in for taller objects. Deep shelves eat a hallway, so check the walking space before you commit.
Related guides

walls
How to patch drywall

painting
How to paint a room
Plan this in your own space
Two or three photos of your own room, yard or garage is enough. The app reads the space, then sizes the materials and the steps to what you actually have.
Plan this in your own space