
How to install vinyl plank flooring
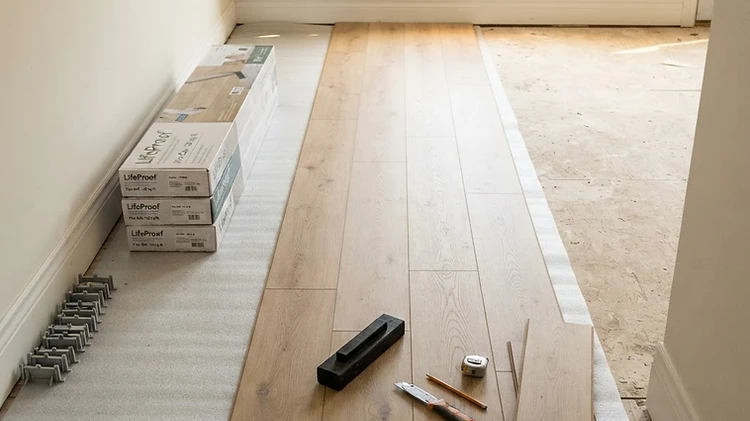
Click-lock vinyl plank floats on the floor rather than being glued down, so a 12 ft by 11 ft room is about a day of laying and 48 hours of doing nothing first. Two things decide whether it still looks right in five years: how flat the subfloor is, and the expansion gap at every wall.
Skill level
Intermediate
Time
Two days for a 12 ft x 11 ft room, most of it waiting
Materials
$410 – $785 for 132 sq ft of floor
Tools
11 on the list
Work out your own quantities
Get your own carton count, with the waste allowance this guide uses built in.
Open the flooring calculatorTools you will need
If you own none of these, buy the cheap version of each — they are all reusable.
- Utility knife with fresh blades
- Tapping block
- Pull bar
- Spacers
- Rubber mallet
- Tape measure and pencil
- Framing square
- Jigsaw or oscillating multi-tool for the door jambs
- 6 ft straightedge or long level
- Knee pads
- Shop vac
Materials list, with the math
Quantities are worked out for the size of job described above, and the arithmetic is shown so you can adjust it for your own space.
Vinyl plank flooring
7 cartons · $35 – $70 each
The room is 12 x 11 = 132 sq ft. A straight lay wants 10% for cuts, so 132 x 1.10 = 145 sq ft. A carton covers about 24 sq ft and 145 / 24 = 6.04, so buy seven: the spare carton covers a miscut and stays boxed for a repair later.
Underlayment, if it is not attached
2 rolls · $25 – $45 each
One roll covers about 100 sq ft, so 132 sq ft of floor needs two rolls with a little spare at the walls.
6 mil vapor barrier
1 roll · $20 – $35
Only over concrete. 132 sq ft plus the 8 in overlaps works out at around 160 sq ft, so a 200 sq ft roll covers it with room to spare.
Spacers
1 pack · $5 – $8
Two spacers per plank along the starting wall, holding the 1/4 in expansion gap while the row sets.
Transition strips
2 · $12 – $20 each
One for the doorway, plus one spare in case the opening is wider than the plank needs or there is a second way in.
Quarter round or baseboard
50 ft · $0.80 – $1.60 per ft
The perimeter of a 12 x 11 room is 2 x (12 + 11) = 46 ft, so 50 ft allows for a mitered cut at each end of every run.
Floor patch or levelling compound
1 bag · $25 – $40
A 10 lb bag fills roughly 10 sq ft at 1/8 in deep, which is about right for a room with two or three dips between joists.
Estimated total
$410 – $785 for 132 sq ft of floor
The steps, in order
12 steps, in the order you would actually do them, with a time estimate for each.
- 1
Empty the room and pull the old trim
Everything out, including anything with a floor flange such as a toilet if this is a bathroom. Pry the baseboard and quarter round off carefully and write on the back of each piece where it came from.
about 60 min
- 2
Check how flat the subfloor is
Anything out of flat by more than 3/16 in over 10 ft shows up through a floating floor as a soft spot or an opening click. Run a 6 ft straightedge across the room in both directions and mark every dip.
about 30 min
- 3
Patch and flatten the low spots
Fill the dips with floor patch, feather the edges, and let it cure for the time on the bag. Sweep and vacuum the whole floor afterwards: one screw or pebble left under the planks becomes a rattle you cannot find later.
about 60 min
- 4
Let the cartons sit in the room
Bring the cartons in 48 hours before you start, laid flat, away from the walls and away from heat. Cold planks laid cold tend to leave joints that open up once the room warms up.
about 30 min
- 5
Choose the direction and the first row
Run planks along the longest wall or towards the main window. Measure the room in plank widths: if the last row would be under 2 in wide, split the difference and start with a ripped row at both sides instead.
about 20 min
- 6
Lay the underlayment
Unroll it wall to wall, tape the seams, and trim it an inch short of the walls so it cannot bunch. Over concrete the vapor barrier goes down first, with 8 in overlaps and the seams taped.
about 45 min
- 7
Cut and place the first row
Cut the tongue off the first plank so it sits flat against the spacers, then click the row together along the starting wall. Keep the 1/4 in gap at the end of the row as well as along the side.
about 60 min
- 8
Cut around the door jambs
Under-cut the jamb with a multi-tool, using an offcut as a height guide, and slide the plank underneath it. Cutting around a jamb instead of under it leaves a gap you will stare at for years.
about 30 min
- 9
Run the rows, staggering the joints
Stagger each row by at least 6 to 8 in so no two end joints line up. Click the long edge first, then tap the short end home with the block and a light mallet, and keep the spacers moving along the wall.
about 180 min
- 10
Cut the last row
Measure every plank separately, because walls are never straight. Rip the row with a utility knife and a square, using a straightedge as a guide, and lay it in reverse so the tongue faces the wall.
about 45 min
- 11
Trim, transitions and the expansion gap
Nail the baseboard or quarter round to the wall, never down into the floor, so it covers the expansion gap while the floor can still move. Fix the transition strip to the subfloor, not to the planks.
about 60 min
- 12
Clean up and stay off it for a day
Vacuum, wipe with a damp cloth, and stay off it for a day. Keep one unopened carton for a future repair: a discontinued floor is the reason whole floors get replaced.
about 30 min
Safety notes
Before you start
- Wear knee pads. A day of kneeling on a hard floor is the most common injury in this job.
- Keep the knife blades fresh and cut away from your body, with the hand holding the straightedge well clear of the blade line.
- Never judge concrete moisture by eye. Tape a 2 ft square of plastic down for 24 hours; condensation underneath means the slab is too damp for a floating floor.
- Keep the room between 60 and 85 F during the install and for 48 hours afterwards.
- Lift the cartons with your legs and get help with anything over 40 lb.
- Never glue, nail or screw a floating floor down, and never fasten trim, cabinets or islands through it.
- Keep spacers, blades and offcuts away from children and pets.
Hire a licensed pro if
Hand these to someone licensed
- The concrete slab tests damp, or the subfloor has rot, soft spots or squeaks that need repairing first.
- The floor is still out by more than 3/16 in over 10 ft after patching, which is a self-levelling job rather than a patch.
- You are taking up old tile, vinyl or mastic in a home built before 1980, where asbestos may be in the flooring or the adhesive.
- The room is over 1,500 sq ft, or the flooring runs up a staircase, where the cutting and the waste allowance change completely.
- There is underfloor heating and the manufacturer's rules for covering it are unclear.
Frequently asked questions
- Can vinyl plank go in a bathroom?
- Most can, but the floor still has to stay dry: it is water-resistant, not waterproof. Use planks rated for wet rooms, caulk the expansion gap under the trim, and wipe up standing water instead of letting it sit.
- Do I need underlayment?
- Only if the planks do not have a pad attached. Check the carton: where the planks carry their own backing, adding a second layer usually voids the manufacturer's warranty.
- How long do the planks need to sit in the room?
- 48 hours, laid flat and spaced away from the walls. Cold planks contract, and a floor laid cold tends to show open joints once the room warms back up.
- Why leave a gap at the wall?
- Vinyl expands and contracts with the temperature. The 1/4 in gap at every wall is the room the floor needs to move, and the baseboard covers it afterwards.
- Straight or angled: how much extra should I buy?
- Ten percent for a straight lay, and fifteen percent for an angled or diagonal lay, because a diagonal cut leaves a triangular offcut at both ends of every row.
Related guides

walls
How to patch drywall

painting
How to paint a room
Plan this in your own space
Two or three photos of your own room, yard or garage is enough. The app reads the space, then sizes the materials and the steps to what you actually have.
Plan this in your own space